It’s a Miracle! Homemade Fat-Free Chips

I have recently learned how to make chips in the microwave with no fat. Yes, you read that correctly. Make your own fat-free potato chips from real potatoes! I was listening to ATK Radio a while ago and they spoke about a gadget that cooks potato chips in the microwave which they tried with success! I was so intrigued I just had to try it for myself.

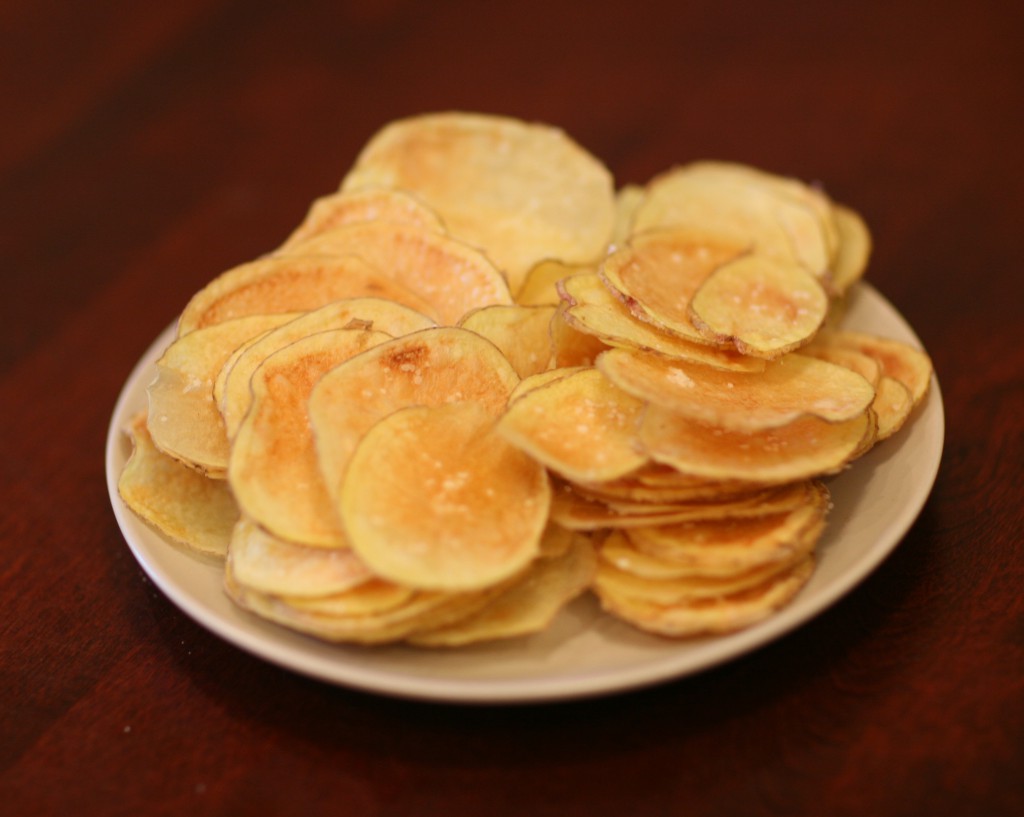
What I ended up getting, were two silicone trays that are covered with a variety of holes. All you do is thinly slice your potato and spread them out on the trays in a single layer. Microwave for about 3 minutes and you get some crispy delicious chips! It also works wonderfully with sweet potatoes and supposedly also works with carrots, beets, parsnips, apples, pears and mangos, although I haven’t tried those yet.

Since I do not like to promote any particular products, I’ll tell you that a quick google search lead me to some posts about doing this same thing with paper plates, glass plates (they used cooking spray) and parchment paper. I tried it out with parchment paper and got very good results. The only things you need to be careful about are the moisture that will accumulate on the parchment as the chips cook and cool (which makes for a soggy chip) and also getting the potato slices on parchment in and out of the microwave is a little trickier.

Making your own chips couldn’t be simpler!

Step1: Thinly slice potatoes. Using a mandoline will make this a lot easier and will ensure even sizing for even cooking.

Step 2: Place potato slices on tray (or parchment) and season as desired. The package instructions said to season after cooking, but then the chips are dry and seasoning doesn’t stick. This is where you can get creative and make your chips unique.

Step 3: Cook in the microwave at high power for about 3 minutes. Each microwave is different so you may need to cook them longer or shorter, make sure to watch them.

Step 4: Enjoy your delicious crunchy homemade chips!

Tackling Thanksgiving

With the holidays fast approaching, now is the time to start thinking about how to successfully get from here to New Years day without any extra pounds or regrets. Thanksgiving is just the first in a whirlwind of celebrating that will last from now until the new year (or Valentines Day for some). To successfully navigate the onslaught of holiday parties and goodies, having a plan will get you through so that you won’t wind up feeling eater’s remorse in January.

  • Try to keep to your normal eating habits and routines as much as possible. Every coffee shop and bakery will be rolling out goodies that are “only available for a limited time” but that doesn’t mean you need to have one every day. An eggnog latte every day between now and Christmas will result in a four and a half pound gain (6 pounds if it’s a Venti!) if you must have this treat, make it special and have it just once or twice.
  • It may be cold outside, but try to keep your kitchen looking like summer. During the summer you might be more likely to keep lots of fresh vegetables and fruit on hand, but in the winter cookies, spiced cakes and holiday candy all tend to find their way into your house. Make it a point to put the sweet sometimes foods into out of the way cabinets and keep the produce more visible. It’s easier to resist something you can’t see and you are more likely to consume the things you see on a daily basis.
  • If there are high calorie holiday treats that you adore, make sure to plan it out, keep portions small and really savor them. You don’t need to approach Thanksgiving dinner as an all or nothing affair. Have a scoop of the super rich mashed potatoes but keep it to one small serving and fill up half of your plate with salad too. Have a little pie for dessert but there’s no need to sample every single one.
  • Don’t “save your calories” for a big dinner or party later in the day. This is always a sure recipe for disaster. Make sure to eat healthy well-balanced meals and snacks throughout the day; you’ll be in a much better mindset to make good choices later if you aren’t absolutely ravenous.

Planning ahead is the key to success for successfully surviving the holidays. If you do slip up, make sure you don’t beat yourself up! Things happen, put it behind you and move forward, and make your very next meal or snack a healthy one. Remember to stop, look around, and enjoy the holidays with the people who are special in your life!

Roasted Butternut Squash Soup

Now that the cold weather is officially sweeping in, I’ve started my winter soup production (you may remember the delicious lentil stew that I blogged about last winter). When it’s chilly outside, I like to have a variety of soups on hand in the freezer as a quick option to augment a meal or just as a snack. In the fall and winter months, many people have a harder time incorporating lots of vegetables into their daily diets. While summer produce seems to call out to us, winter’s chill can make hot cocoa and cookies so much more appealing. I find that a hot mug of soup can be a very satisfying, and warming alternative, and if it’s vegetable heavy you get a few extra servings of vegetables; a win – win!

With all of the beautiful squash that is currently in the market, I decided to make a roasted butternut squash soup this week. Roasting the squash before puréeing it into the soup gives it a deeper more complex flavor that is fantastic. Roasting also keeps the hands-on watch-the-stove time to a minimum and makes your kitchen smell delicious!

I started with a large butternut squash which I peeled and cubed, and also added three large onions that were peeled and quartered. I tossed them together with a drizzle of olive oil and sprinkled them with salt and pepper before putting into a 450 degree oven. They roasted for about 50 minutes with a quick stir in the middle of cooking.


I then put the squash and onions into a pot with four cups of warm chicken broth. I let the flavors meld a bit, then blended them all together and checked for seasoning. If the soup seems a little too thick at this point, you can simply add some more broth or water until it is the right consistency. This is one of those deceptively simple recipes that have an endless number of possibilities to change up the flavors. I have done this same idea with any combination of roasted sweet potatoes, cauliflower, shallots, beets, carrots, and anything else that looks good in the market and seems to work well together. The seasoning can be changed up with cumin, curry, cinnamon, garlic, paprika, red pepper, and many more.

I like to ladle the soup into single serving plastic containers and put them in the freezer; when I want some soup, I run the container under warm water until the frozen soup can easily be popped out and put into a microwave safe bowl. Bon appétit!

Smoothie Making 101

A classic combination of banana and strawberry blended with milk and a dash of vanilla.

Smoothies have been a bit of a food trend for quite a few years, and now green smoothies have also become vogue. A friend has recently gotten into a green smoothie kick after having one at the local farmers market, and she asked what I thought about them. My response was, what’s not to love? Smoothies can definitely have their place in a healthy diet, especially when you fill them up with lots of great ingredients! Just be aware that some smoothies you can buy pre-made, are loaded with sugar and will not do you any nutritional favors.

Step one in smoothie making is to define its purpose. Is it a snack? A meal? A treat? A way to refuel post-workout or fuel up prior to a workout? This will help you to decide what to put in, to reach the appropriate amount of calories, protein, and carbohydrates. Personally, I’ve been using smoothies as a post run drink for years, and the recipe changes with the season and with the type of workout I’ve had. After a four mile loop I don’t need to bulk up my ingredients in the same way as I would for ten miles, so I make sure to adjust accordingly.

For an antioxidant kick: a combination of frozen cherries and cocoa powder mixed with yogurt and milk.

I usually start with the fruit I have in the house and see what I have that will go together. I typically have bananas and they go with almost anything (in my mind), as well as frozen strawberries, blueberries, cherries, pineapple, mango and raspberries. Frozen fruits are not only cost effective, but they are usually picked at the peak of freshness and frozen not long after, which helps them to retain both flavor and nutrients. When in season, I also like to use things like watermelon (you need to cut back on the added liquids), oranges (not just the juice), and almost any other type of fruit; I’ve also used canned pumpkin when I had some left over from another use. Here’s where you can definitely add a handful of spinach or other greens and see what happens. Bright green color but not too much flavor change (depending upon the amount) is typical. This is a great alternative for those who aren’t yet ready to have a spinach salad but still want to reap the benefits of this nutritional powerhouse.

After you have your fruit sorted out, you can proceed with the type of liquid you want to use. I typically use skim milk and sometimes soy milk if I have it in the refrigerator; when combined with the other ingredients, it brings my protein to carbohydrate ratio right into the 1:3 or 1:4 range where I want it. Sometimes I use other things like tart cherry juice, almond milk or coconut milk for a change of pace. If I use one of these alternatives, I make sure to include some greek yogurt or silken tofu to reach my protein needs.

A tropical smoothie: frozen pineapple, coconut milk, banana, and silken tofu.

Other add-ins you can try are flax seeds or chia seeds. These are a good source of Omega 3′s as well as fiber. If you use flax seeds, make sure they are ground before adding because the hard outer coating of these seeds will keep them from being digested. Some people also add a scoop of uncooked oats for the fiber and protein they add. With all of these options, you will need to be aware that they will absorb a lot of the liquid in your smoothie and adjust accordingly.

Lastly, add-ins like vanilla, cinnamon, and nutmeg can be great flavor boosters. A tablespoon of cocoa powder will not only add flavor but it is rich in flavonoids and minerals. Some people even like a dash of spice to perk things up. In the summer, adding a few ice cubes are also a great way to cool down and make your smoothie a little more slushy in quality. Experiment with the many combinations that can be made easily in your own kitchen to suit your own personal taste!